Hydraulic crimping tools are essential equipment for anyone working with hydraulic hoses, electrical cables, or industrial fittings. Whether you’re assembling hydraulic hoses for heavy machinery, creating custom cable assemblies, or working in automotive repair, knowing how to use a hydraulic crimping tool correctly ensures safe, leak-free connections every time.
This complete guide walks you through everything you need to know — from setup to execution — so you can crimp hoses and fittings with professional results.
What Is a Hydraulic Crimping Tool?
A hydraulic crimping tool (also called a hydraulic hose crimper or hydraulic press crimper) is a specialized device that uses hydraulic pressure to compress a metal ferrule or sleeve onto a hose and fitting assembly. This creates a permanent, secure connection that can withstand high pressures without leaking.
Common applications:
- Hydraulic hose assembly (construction, agriculture, mining equipment)
- Automotive brake lines and power steering hoses
- Industrial pneumatic systems
- Electrical cable terminations
- HVAC refrigerant lines
The crimping process deforms the metal ferrule around both the hose and the fitting insert, creating a mechanical bond that’s often stronger than welding.
Types of Hydraulic Crimping Tools
Before we get into the how-to, it’s important to understand which type of crimper you’re working with:
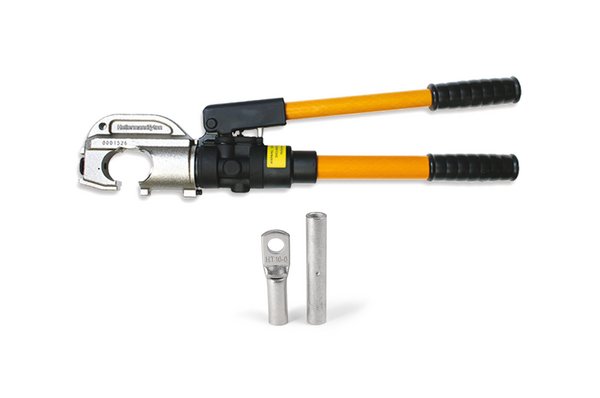
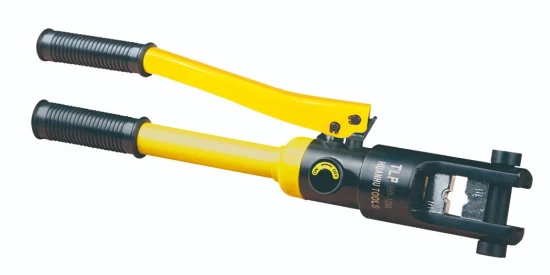
1. Handheld Hydraulic Crimpers
Small, portable tools operated by hand pump. Best for light-duty work, small hose sizes, and field repairs.
Typical capacity: Up to 1-inch hose diameter
Crimping force: 6-12 tons
2. Bench-Mounted Hydraulic Crimpers
Stationary tools mounted on a workbench. Operated by foot pedal or hand lever. Ideal for workshop environments.
Typical capacity: Up to 2-inch hose diameter
Crimping force: 15-30 tons
3. Floor-Standing Hydraulic Crimpers
Heavy-duty industrial machines for high-volume production or large hose assemblies.
Typical capacity: Up to 4-inch+ hose diameter
Crimping force: 30-100+ tons
This guide covers the general process applicable to all types, with notes where procedures differ.
Safety First: Essential Precautions
Before you start crimping, review these critical safety rules:
Personal Protective Equipment (PPE):
- Safety glasses or face shield (mandatory)
- Work gloves (cut-resistant)
- Steel-toed boots
- Hearing protection (for high-volume operations)
Workspace Safety:
- Keep work area clean and well-lit
- Ensure crimper is on a stable, level surface
- Keep fingers and body parts clear of crimping jaws
- Never bypass safety guards or interlocks
- Disconnect power/pressure when changing dies
Hydraulic Safety:
- Check hydraulic fluid levels before use
- Inspect hoses for damage or leaks
- Never exceed the tool’s rated pressure
- Release pressure fully before opening the tool
Material Handling:
- Use proper lifting techniques for heavy hoses
- Secure long hoses to prevent swinging
- Keep hose ends clean and free of debris
Remember: Hydraulic crimpers generate tremendous force (often 10-100 tons). Treat them with respect.
Tools and Materials You’ll Need
Gather everything before you start:
Essential Equipment:
- Hydraulic crimping tool with appropriate dies
- Hose cutting tool or saw
- Measuring tape or ruler
- Deburring tool or file
- Cleaning solvent and rags
- Hose assembly instructions or crimp specifications
Materials:
- Hydraulic hose (correct size and pressure rating)
- Hose fittings (barbed insert or mandrel)
- Ferrules or crimp sleeves (matching hose and fitting size)
- Protective end caps (optional, for storage)
Reference Materials:
- Crimp specification chart (critical!)
- Hose and fitting compatibility chart
- Die selection guide
Step 1: Select the Correct Die
The crimping die determines the final diameter and shape of the crimped ferrule. Using the wrong die will result in leaks or fitting failure.
How to choose the right die:
- Check the ferrule size — The ferrule will have markings indicating the hose size (e.g., “-8” for 1/2-inch hose)
- Consult the crimp specification chart — This chart (provided by the fitting manufacturer) tells you the exact crimp diameter needed
- Match the die to the specification — Each die is marked with the diameter it produces (e.g., “0.750” means it crimps to 0.750 inches)
Common mistake to avoid: Don’t guess. Always verify with the specification chart. A crimp that’s too large will leak. Too small will damage the hose.
Installing the die:
- Release all hydraulic pressure
- Remove safety pin or locking mechanism
- Slide out the old die set
- Insert the new die set (ensure it’s seated fully)
- Replace safety pin or lock
- Test the die by doing a partial crimp on scrap material
Step 2: Cut the Hose to Length
Accurate hose length is critical for proper assembly.
Cutting procedure:
- Measure carefully — Account for the length the fittings will occupy (typically 2-4 inches per end)
- Mark the cut line — Use a marker or tape around the hose circumference
- Use a proper hose cutter — A sharp hose saw or dedicated hose cutting tool gives the cleanest cut. Avoid using hacksaws (they leave burrs)
- Cut square — The hose end must be perpendicular to the hose axis. Angled cuts prevent proper fitting insertion
- Inspect the cut — The inner tube should be visible and intact. No outer cover should extend past the reinforcement
Pro tip: For wire-braided hoses, make sure no wire strands are protruding from the cut end. Trim any loose wires with side cutters.
Step 3: Prepare the Hose End
Proper preparation prevents contamination and ensures a tight seal.
Preparation steps:
- Remove any outer covering — Some hoses require the outer cover to be stripped back slightly (check fitting instructions)
- Deburr the hose end — Use a deburring tool or fine file to remove any rough edges from the cut
- Clean the hose interior — Blow out any debris with compressed air. Wipe the outside with a clean rag
- Inspect for damage — Check that the reinforcement layers are intact and not crushed
Critical check: The hose end should be smooth, clean, and square. Any contamination will be trapped inside the assembly.
Step 4: Install the Ferrule
The ferrule (also called the crimp sleeve) goes on the hose before the fitting.
Installation procedure:
- Slide the ferrule onto the hose — It should move freely but fit snugly
- Position it back from the end — Leave room for the fitting insert to be installed (usually 1-2 inches)
- Ensure correct orientation — Some ferrules are directional (tapered end faces a specific direction). Check the fitting instructions
- Do not crimp yet — The ferrule stays loose until the fitting is in place
Common error: Installing the ferrule in the wrong direction or forgetting it entirely. Always double-check before inserting the fitting.
Step 5: Insert the Fitting
The fitting (barbed insert or mandrel) goes inside the hose and locks the assembly together.
Insertion procedure:
- Lubricate if needed — Some fittings require a small amount of assembly lubricant or soapy water. Check manufacturer recommendations
- Align the fitting with the hose — Make sure it’s straight
- Push firmly — The fitting should insert until the barbs or serrations fully engage the hose inner tube
- Check insertion depth — Most fittings have a depth mark or shoulder. The hose end should reach this point
- Verify alignment — The fitting should be straight and centered in the hose, not angled
Force required: Fitting insertion can require significant force, especially for larger hoses. Use a vice or insertion tool if needed, but never use a hammer (it can damage the fitting).
Critical check: The fitting must be fully seated. Partial insertion will cause the crimp to fail.
Step 6: Position the Ferrule for Crimping
Now slide the ferrule forward to its final position.
Positioning steps:
- Slide the ferrule forward — Move it over the fitting until it covers the barbed section
- Align with crimp location marks — Most fittings have marks showing where the ferrule should be positioned
- Ensure full coverage — The ferrule should cover all barbs or serrations completely
- Check the gap — There should be a small gap (typically 1/16 to 1/8 inch) between the ferrule and the fitting hex or body
Visual check: Look for any gaps between the ferrule and hose. The ferrule should sit flush against the hose with no air space.
Step 7: Load the Assembly into the Crimper
Proper positioning in the crimper ensures an even, centered crimp.
Loading procedure:
- Open the crimper jaws fully — Pump the release valve or use the manual release
- Position the assembly — Place the ferrule in the center of the crimping die
- Align the hose — The hose should be perpendicular to the die jaws (not angled)
- Check clearance — Ensure the fitting body and hose have clearance and won’t contact the crimper frame
- Support long hoses — Use a hose support or have a helper hold long assemblies to prevent sagging
Common mistake: Positioning the ferrule too far forward or back in the die results in an off-center crimp.
Step 8: Perform the Crimp
This is the critical step. Take your time and do it right.
Crimping procedure:
- Double-check everything — Verify die selection, ferrule position, and hose alignment one last time
- Close the safety guard — If your crimper has a guard, close it
- Begin pumping — For manual crimpers, pump the handle steadily. For powered crimpers, press the foot pedal or activate the control
- Watch the crimp form — The die jaws should close evenly around the ferrule
- Crimp to specification — Continue until the crimp diameter matches the specification. Most crimpers have a gauge or automatic stop
- Do not over-crimp — Stop when you reach the specified diameter. Over-crimping damages the hose and fitting
- Release pressure — Open the release valve to retract the die jaws
- Remove the assembly — Carefully take the crimped hose out of the crimper
For automatic crimpers: Set the crimp diameter on the control panel. The machine will automatically stop at the correct point.
Timing: A typical crimp takes 10-30 seconds, depending on hose size and crimper type.
Step 9: Inspect the Crimped Assembly
Quality control is essential. Every crimp should be inspected.
Inspection checklist:
✅ Measure the crimp diameter — Use calipers or a crimp gauge. Compare to specification (should be within ±0.010 inches)
✅ Check for uniform crimp — The ferrule should be compressed evenly all around (no flat spots or bulges)
✅ Look for cracks — Inspect the ferrule for any cracks or splits
✅ Verify ferrule position — Ensure the ferrule didn’t shift during crimping
✅ Check the hose — Make sure the hose didn’t collapse or deform
✅ Inspect the fitting — Verify the fitting hex or threads aren’t damaged
Visual signs of a good crimp:
- Smooth, even compression around the entire circumference
- The ferrule has visible indentations from the die pattern
- No gaps between the ferrule and the hose
- Fitting is secure and doesn’t rotate
Signs of a bad crimp:
- Crimp diameter out of specification
- Uneven compression (one side tighter than the other)
- Cracks in the ferrule
- Ferrule shifted or skewed
- Hose crushed or kinked
If the crimp is bad, cut it off and start over. Never use a faulty crimped assembly.
Step 10: Pressure Test (Recommended)
For critical applications, pressure testing is essential.
Testing procedure:
- Install end caps or connect to test equipment — Use a hydraulic test bench or pressure tester
- Gradually increase pressure — Start at 25% of rated pressure, then 50%, 75%, and finally full rated pressure
- Hold at test pressure — Maintain full pressure for 30-60 seconds
- Inspect for leaks — Look for fluid seepage at the crimp points
- Check for swelling — The hose should not bulge or deform
Test pressure: Typically 1.5x to 2x the hose’s maximum working pressure (check manufacturer specifications)
If it leaks: The crimp is defective. Cut it off and recrimp with a new ferrule.
Common Mistakes and How to Avoid Them
Learn from these frequent errors:
1. Wrong Die Size
Problem: Crimp is too loose or too tight
Solution: Always verify die selection with the crimp specification chart
2. Partial Fitting Insertion
Problem: Fitting pulls out or leaks
Solution: Check insertion depth before crimping. Use insertion tools for stubborn fittings
3. Dirty Hose Interior
Problem: Contamination causes system failure
Solution: Always blow out and clean hose ends before assembly
4. Off-Center Crimp
Problem: Uneven crimp causes weak spots
Solution: Ensure the hose is perpendicular to the die, and the ferrule is centered
5. Over-Crimping
Problem: Hose or fitting is damaged
Solution: Stop at the specified crimp diameter. Use the gauge or auto-stop feature
6. Skipping Inspection
Problem: Defective assemblies enter service
Solution: Inspect every crimp with calipers and a visual check
Maintenance Tips for Your Hydraulic Crimper
Keep your crimper in top condition:
Daily:
- Wipe down dies and jaws
- Check the hydraulic fluid level
- Inspect for leaks
Weekly:
- Clean dies thoroughly with solvent
- Lubricate moving parts per the manufacturer’s instructions
- Check the alignment
Monthly:
- Inspect hydraulic hoses for wear
- Test pressure relief valve
- Calibrate the crimp gauge
Annually:
- Professional calibration check
- Replace hydraulic fluid
- Full inspection by a qualified technician
Proper maintenance extends tool life and ensures consistent, accurate crimps.
Troubleshooting Common Problems
Crimper Won’t Build Pressure
- Check the hydraulic fluid level
- Inspect for leaks in hoses or seals
- Verify the release valve is fully closed
- Check for air in the hydraulic system (bleed if needed)
Uneven Crimp
- Check the alignment
- Ensure the hose is positioned straight in the die
- Inspect the die for wear or damage
- Verify the ferrule isn’t deformed before crimping
Ferrule Cracks During Crimping
- May be over-crimping — check specification
- The ferrule may be the wrong material for the application
- Die may have sharp edges (inspect and deburr)
Crimp Diameter Won’t Meet Specification
- Wrong die installed
- Die is worn and needs replacement
- Crimp gauge needs calibration
- Ferrule is incorrect size
When to Replace Dies
Crimping dies wear out over time. Replace them when:
- Crimp diameter is consistently out of specification
- Dies have visible cracks or chips
- Surface finish is rough or pitted
- After approximately 10,000-20,000 crimps (varies by manufacturer)
Using worn dies produces inconsistent, unreliable crimps. Don’t risk it.
Best Practices for Professional Results
Follow these expert tips:
1. Keep detailed records — Log crimp specifications, die changes, and maintenance
2. Use genuine parts — OEM ferrules and fittings ensure compatibility
3. Train all operators — Everyone using the crimper should be properly trained
4. Create a crimp specification library — Keep all manufacturer spec charts organized and accessible
5. Batch similar work — Group crimps that use the same die to minimize changeovers
6. Label completed assemblies — Mark hoses with pressure rating, date, and crimper operator
7. Stock common dies — Keep frequently used die sizes readily available
Using a hydraulic crimping tool correctly is a skill that improves with practice. Follow these steps every time, and you’ll produce professional-quality hose assemblies that are safe, leak-free, and reliable.
Remember the three keys to success:
- Preparation — Proper hose cutting and cleaning
- Precision — Correct die selection and crimp diameter
- Inspection — Always verify your work before putting assemblies into service
Whether you’re assembling hydraulic hoses for construction equipment, creating custom brake lines, or building pneumatic systems, mastering the crimping process ensures your work meets professional standards.
Need Quality Hydraulic Crimping Tools?
At PluzGroup, we supply professional-grade hydraulic crimping tools and hose coupling machines for workshops, field service, and industrial operations. Our equipment is built for accuracy, reliability, and long service life.
We offer:
- Handheld, bench-mounted, and floor-standing crimpers
- Complete die sets for all common hose sizes
- Hose cutting and preparation tools
- Technical support and training
- Replacement parts and service
Contact PluzGroup today for expert advice on selecting the right crimping equipment for your operation.